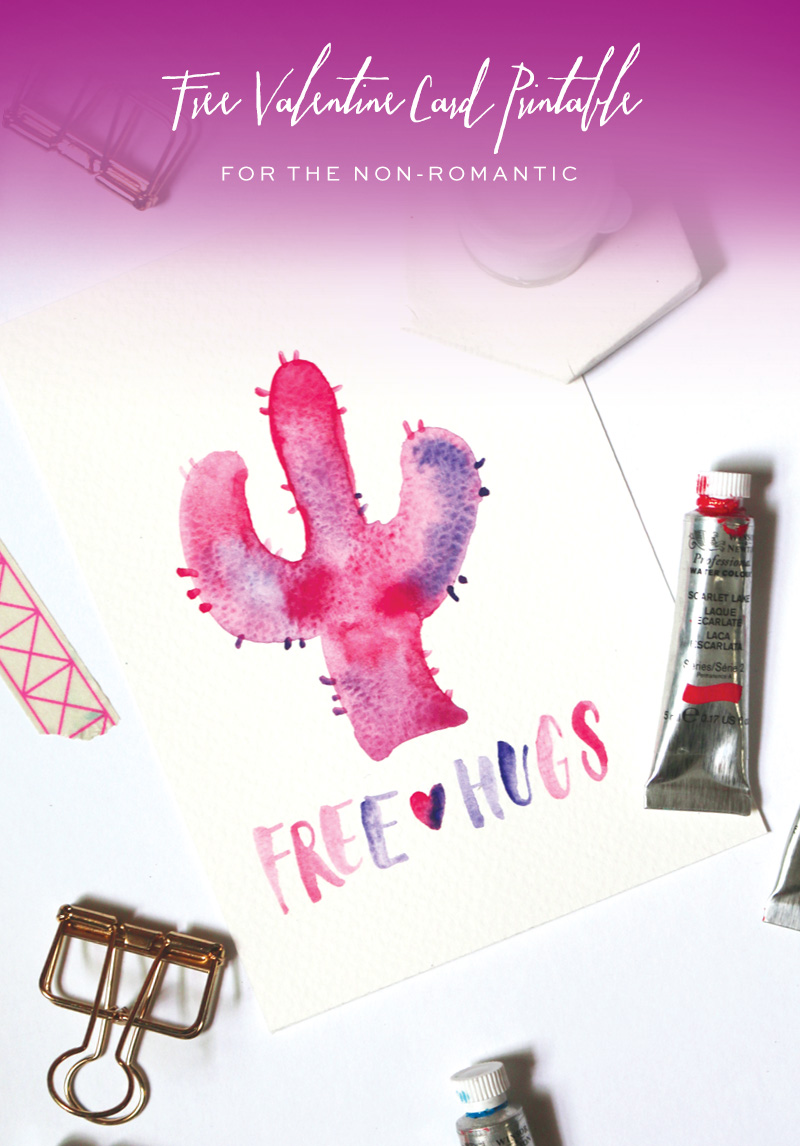
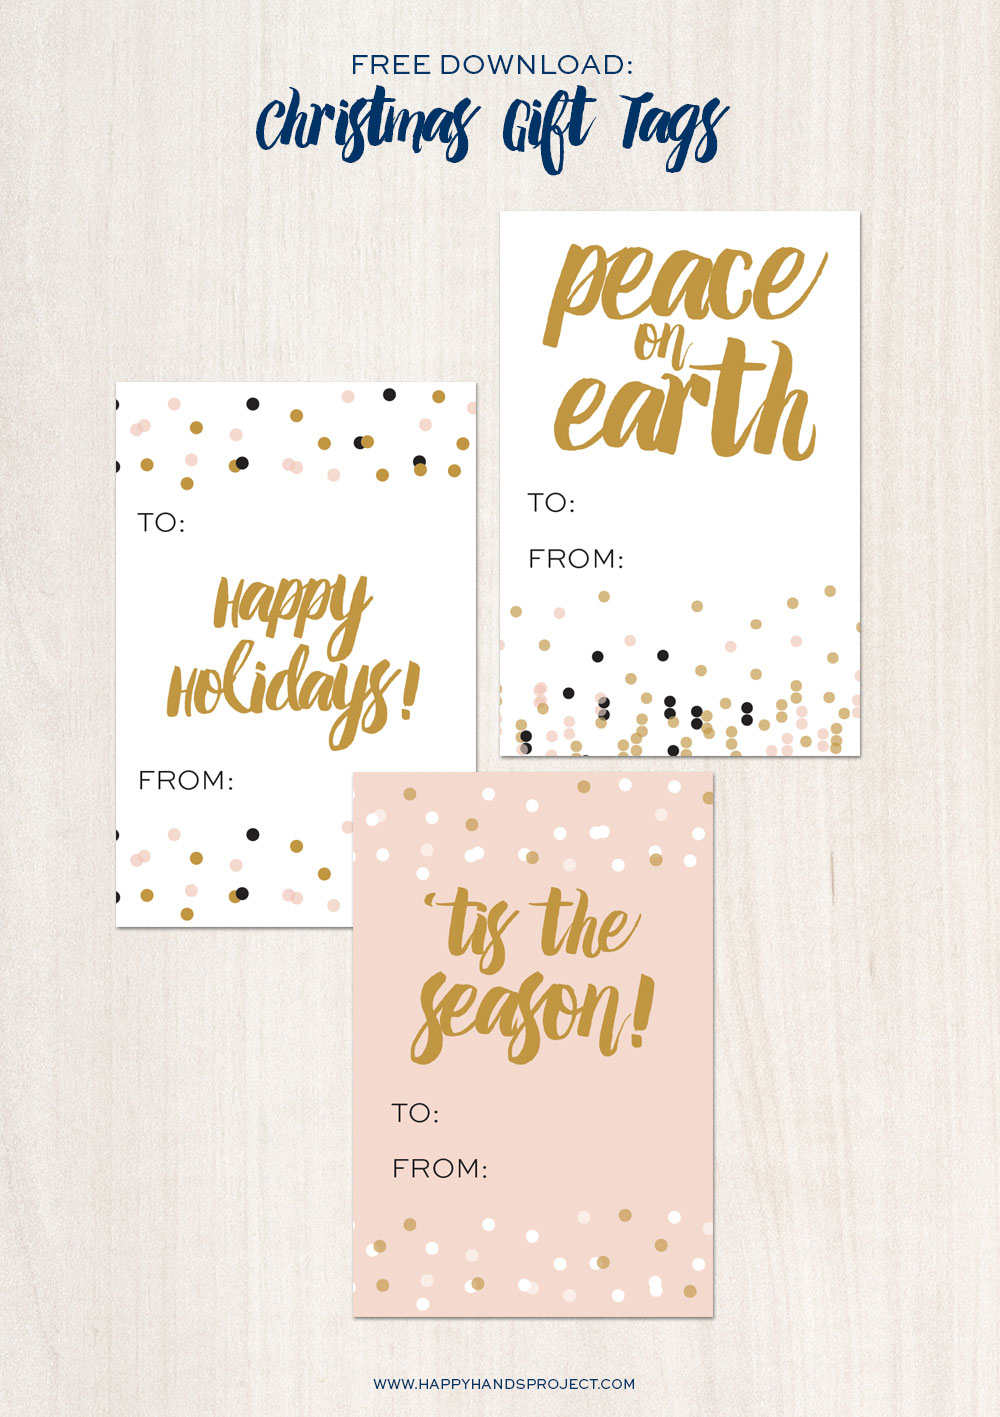
Freebie: Printable Valentine Card

Printable Valentine Card via Happy Hands Project

So. Valentine’s Day is right around the corner, and let’s face it — not everyone is in the mood for cheesy love cards. I wanted to paint something using my black Higgins Eternal ink, but I was painting with my 5-year old (and she was happily blending reds and greens to make cherries) so I thought pink would be nice.

Here’s my interpretation of the unromantic Valentine card. A prickly cactus in a blend of pink and purple, giving free hugs to those who dare. I threw in a tiny heart just for kicks. Perfect for those you have utterly no romantic feelings for, but you love ’em anyway. Hope you love this free printable as much as I did!


Freebie: Printable Holiday Confetti Gift Tags

Confetti Gift Tags via Happy Hands Project

The holidays are coming! I’m very excited for this year’s Christmas because my family’s coming and right now I’m busy putting together our Christmas menu. I have 3 types of dessert on my list now, nothing else.

I know we’re all busy with Christmas shopping, but we should not neglect the art of gift wrapping! I’ve put together some gift tags for you to download and print on card stock. I’ll be using these myself and will be pairing the with some kraft paper-covered gifts. I felt like sprinkling confetti all around me because of the excitement, so here are some confetti-inspired tags to complete your presents. These will look great on gold wrapping paper, too, if you’re into some glam!

You can get your free printable gift tags here. Share the love!

‘Make A Wish’ Stamp Set Winner

First off, thank you to everyone who joined the giveaway. You were all amazing! Your kind and welcoming words were very heartwarming and I enjoyed reading through all your wishes. I just realised how cold it probably is on the other side of the planet – a lot of you were wishing for Spring! Just a week ago we were wishing for rain here in Singapore. It has become so dry, grass is turning brown, and forests were burning. We got our wish eventually and I’m sure all of us heaved a sigh of relief when the first drops of rain fell.

Now for the giveaway, I have chosen a winner! Making the decision was really tough because there were really quite a lot of touching and profound wishes. If only I could play Santa! So, drumroll please… congratulations Jenny Renee! Here’s the wish that will win your hearts:


“If I could have one wish today it would be to be given a complete day off from both of my jobs so that I can spend time with my kids. Being the sole provider can be tough and involves sacrifices, like not spending as much time with them as I would like.”


Jenny Renee, please send your full name and mailing address to pauline (at) happyhandsproject.com for your ‘Make A Wish‘ stamp set from Mama ElephantCurious as to what the ‘Make A Wish‘ stamp set looks like on handmade cards? I scoured 2 wonderful blogs and here are my favourites:

Happy Birthday Card via Happy Hands Project
Go On Celebrate Card via Happy Hands Project

Make A Wish Card via Happy Hands Project


I can’t thank you enough for all your responses. Another hand-lettered stamp set will be released soon so drop by soon for another update! You can also like The Happy Hands Project page on Facebook so you’ll be kept in the loop.

My Very Own Letterpress Business Cards by Twenty O Four

This has been long overdue! I was so excited for my family’s trip to Manila last December because my freshly lettepressed business cards were waiting for me. Oh, how I loved them! They were done by Twenty O Four, and they were done so nicely. Customer service was awesome – Jihannee was a pleasure to work with. I have started passing some of these around – you’ll get one if I bump into you, my dear reader, that’s for sure!

Letterpress Business Cards via Happy Hands Project

Handmade How-To: Botanical Note Cards Using Dingbats

DIY Botanical Notecards via Happy Hands Project

2014 is here! I hope you all had a great New Year’s Eve celebration. I’d like to start this year (and the 2nd year of Happy Hands Project… wee!) with a note card DIY. Botanical themes grew in popularity this year and making them is easy-peasy. There are a lot of wonderful greeting cards for sale out there, like these cards from Amy Sullivan and florals from Rifle Paper Co., but if you want to make some on your own, here’s an easy way to do it. And the best thing is, it’s all for free!

In this DIY, we will be making 2 A6 cards which will fit nicely into C6 envelopes. We will be working with Adobe Illustrator, a downloadable dingbat font, and another font of your choice to write a message on the card. I am using Illustrator CS6 on a Mac, as you will see on the photos that will follow.

Let’s get all the materials ready, shall we? First, download and install the font Arboris Folium. Then download this chalkboard background from Besotted. If you’re printing the cards right away, have your card stock ready, too, preferably between 200-250gsm.

{1}
Open a new document in Illustrator. Select an Artboard size, which should be the same size as the paper you’ll be using. In my case, I use A4. Click ‘Landscape’ for the Orientation so you’ll be laying out the cards nicely on a horizontal page.

DIY Botanical Notecards via Happy Hands Project

{2}
Make a rectangle using the rectangle tool (click M for the shortcut).  Position your pointer somewhere on the artboard and click once – enter the size 105mm x 148mm on the window that pops out. This will be how big your card will be.

DIY Botanical Notecards via Happy Hands Project

{3}
Place your background onto the artboard. Go to File, select Place, and locate the file ‘CHALKBOARD_TEXTURE_BB.jpg’. The image will be placed on top of the rectangle you just made earlier. Resize the chalkboard background to a size you like. Just make sure it’s bigger than your rectangle.

DIY Botanical Notecards via Happy Hands Project

{4}
Position your chalkboard background to the back of the rectangle – Object, select Arrange, then select Send to Back (click shift + cmd + [ for the shortcut). Now that the background is behind the rectangle, we can proceed with the masking. Masking the background means that it will take the shape of the rectangle above it.

{5}
Masking! Select both chalkboard and rectangle using your Selection Tool (hit V for the shortcut). Click Object – Clipping Mask – Make.

DIY Botanical Notecards via Happy Hands Project

DIY Botanical Notecards via Happy Hands Project

{6}
Pull out your Glyphs Panel. It’s time to select a botanical element for your card! Click on Window – Type – Glyphs, and a panel will come out. This window will be displaying the characters available in a certain font. Choose Arboris Folium font to see all the dingbats this font has. (Warning: Prepare to ooooh and aaaah. I love this font!)

DIY Botanical Notecards via Happy Hands Project

{7}
Time to pick a specific element that you like. To make it appear on your artboard, click the Text tool (shortcut: T) and click anywhere on your chalkboard. Change the text color to white and type in a huge text size. In my case I used 275 pt, but you can go lower or higher. You can always adjust it later. Once you’ve chosen an element, position it to your liking. I centered mine as you can see.

DIY Botanical Notecards via Happy Hands Project

{8}
Do you want a different element on the other card? Repeat the same process, and you’ll have 2 cards in no time.

DIY Botanical Notecards via Happy Hands Project

{9}
If you want to write a message anywhere on your card, select a font you like and lower the font size. How big your text will be is totally up to you. Just in case you’re curious, I used Cantoni DIY Wedding font by Debi Sementelli. It’s gorgeous.

That’s it! Load your card stock into your printer and you have 2 note cards! Happy writing, and have a wonderful New Year everyone!


Free Printable Mother’s Day Card


We will all be celebrating motherhood soon! Even though I am miles away from my Mom, I’m sending a card out to her today. I’m looking forward to celebrate with her when we see each other three weeks from now! I’m super excited with our upcoming trip… but I have to stop myself because that’s another story.

MothersDayCard-HappyHandsProject-1

I was trying to check the spelling for Mother’s Day earlier. Should it be spelled as ‘Mother’s’ or ‘Mothers’? Well, Anna Jarvis, the founder of the holiday, specifically noted that “Mother’s” should “be a singular possessive, for each family to honour their mother, not a plural possessive commemorating all mothers in the world.”

Can’t argue with Miss Jarvis on that, so here’s a printable card to commemorate the wonderful existence of our own Moms. I’ve been having fun with brush lettering lately, and this was originally done in watercolor. Download yours here! Let her know how awesome she is.

MothersDayCard-HappyHandsProject-2

Handmade How-To: DIY Gold Note Cards


DIY Handmade Notecards-5


I used to be a silver-loving person. I just felt that silver is the most neutral metallic color, if there ever is such a thing. Until I laid my hands on my husband’s gold spray paint. Ever since I discovered how nicely it adhered to any type of surface, I just wanted to ‘Pylox’ everything that comes my way. No, really. I found out the gold paint covers my thick card stocks very smoothly, so I experimented making some note cards.


DIY Handmade Notecards-1


Here are the things I used:

  • A4 size card stock (I used a shimmery 250gsm card) plus a few extra ones
  • Gold spray paint (I used Pylox, but feel free to use another brand)
  • Rubber cutting mat and cutting materials
  • Ruler
  • Newspapers
  • Pens, markers and any writing instrument you prefer
  • Masking tape
  • Embellishments


I know not everyone has her own rubber mat, so some alternatives are a stack of newspapers or a large piece of cardboard box. You just need a cardboard that you can slash on that is thick enough to protect the surface underneath.

So are you ready to make personalized note cards? Let’s go!

{01}
Cut your card stock to desired size. I usually cut mine equally into 4 pieces, and they perfectly fit inside a C6 (114x162mm) envelope. Here’s a guide to envelope sizes if you need one.

{02}
Make use of your masking tape and extra card stock. Cut your tape and cover parts of your card that you want unpainted. Those clean spaces will be for your handwritten messages, embellishments or drawings. If you prefer having minimal paint and more writing space, use your extra cardboard to cover your note card. Tape the edges of the cardboard to keep them in place. On one of my cards, I cut a circle and stuck it onto the center of my note card. The center will remain white while the rest will be painted gold.

{03}
Set up your spray painting area! Make sure you are in a well-ventilated place and cover the floor with newspapers. If it’s windy, stick your cards onto the newspapers. One tape underneath will be easy enough to peel off.

{04}
Place your note cards on the covered floor. Shake your spray can for a minute or two to make sure the paint will be smooth when applied. Oh, and keep the cap on when you do so!

DIY Handmade Notecards-3

{05}
It’s time to start spraying! I hold my can about a foot from the note cards and spray lightly and quickly in a horizontal manner. I usually spray a second coat to make sure even the tiniest bits are covered. Leave your painted cards for about an hour to dry.

DIY Handmade Notecards-2

{06}
And now for the best part! I love peeling off masking tape to reveal straight edges. It’s also a nice surprise to see how each card would look like sans the strips of tape.

{07}
Decorate, embellish and write on your cards. The possibilities are endless. You can use strips of washi or fabric tape to prettify your works of art, or just use your favorite pen and doodle all you want.

DIY Handmade Notecards-6


Nothing beats a handmade card sent by snail mail, in my opinion. How would you ‘Pylox’ your cards? I’d love to see how they would look like! Tag me on Instagram.


DIY Handmade Notecards-7

An Autumn Wedding {Robby and Maan}


Autumn Themed Wedding

Autumn Wedding Invitation Suite

Happy Day of Hearts, everyone! I’m starting off Valentine’s Day with a wedding that was lots of fun and full of romance. And earthy, orange hues.

When Maan, the bride and now officially my Sister-in-Law, told me that their wedding theme was Autumn, I started thinking about red and brown maple leaves and pumpkin spice. Some wooden centerpieces with orange flowers. What a lovely theme to work on! I have to say Maan was a very hands-on bride who has a good taste in design. She favored a hand-lettered script over fonts, so I came up with a flourish-y lettering for their monogram. Once it was settled, the design for the invitation suite soon came after. I designed the main invite and entourage cards, a reception card and the map.

Autumn Wedding Invitation Suite

Autumn Wedding Invitation Suite

My favorite part in designing the whole suite was the reception card. The orange cocktail dress, specifically.

The wedding was in November last year, and I have to say it was a terribly busy month for my little family. We flew to Manila, Philippines a couple of days before the big day. I was just so thankful that our little ‘un enjoyed walking along the Changi Airport travellator so much that she was asleep during most of the 3.5 hour-flight. Lucky, indeed!

Autumn Themed Wedding

Autumn Wedding Invitation Suite

Autumn Themed Wedding

And oh, it was a beautiful wedding. All the elements from the bridal bouquet, the gentlemen’s boutonnières, to the table centerpieces, just came together so elegantly. The orange ombré style cake was also a delicious eye candy (tasted heavenly, too!). It was certainly autumn at the Blue Leaf that night. Congratulations to the lovely couple! Thank you for making me a part of your wedding.

Autumn Themed Wedding

Autumn Wedding Invitation Suite

Autumn Wedding Invitation Suite

Autumn Themed Wedding

Photography: J Lucas Reyes
Flowers: Dylan Gozum of Vatel Manila

Ring and Coin Nests and Boutonnières: Cecile Roxas-Padecio of {etc} Handmade Goodness
Reception Styling: Kaye Cunanan of K by Cunanan Catering
Cake: Gervy’s Amazing Cakes
Kokeshi Dolls: Khristine Borbe of Handmade by Khristine


Printable Valentine’s Day Card


When I was about 10, we had a craft project in school for Valentine’s Day. We were asked to bring old greeting cards and recycle them to make a new one. Oh, how thrilled I was! With school glue and scissors in hand, I cut up hearts and pictures to make a Valentine card for my Mom. I remember trying to make a heart (or flower, my memory is already a bit bleary) pop up when the card is opened.

I managed to make a small cardboard accordion and glued the heart (or flower!) on top of it. Kind of like a Jack-in-the-Box effect. The pop-up heart didn’t surprise my Mom at all, but it sure did make her happy.

YouAreLoved Card

As a tribute to my childhood tradition of handmade cards, I made a watercolor illustration last weekend for my Mom and Aunts. I’m sharing this with you so we can all extend some handmade love to the people we care about. Spread the love!

Download the printable card here.